")


Have you ever wondered what the low-pass filter (LPF) control on the back of your subwoofer actually does? Think of it like this: a wave of water that requires regulation.
How would you manage it? You’d employ a dam to reduce its flow, transforming it from a powerful surge into a gentle stream. Fortunately, with soundwaves, there’s no concern about excess water accumulation. This is because when we filter frequencies from a soundwave, rather than being stored somewhere else, they get dissipated.
The two filters – high and low pass – work on a similar principle. Essentially, they manipulate the soundwave before it reaches the speakers – or our case, subwoofers.

Key takeaways
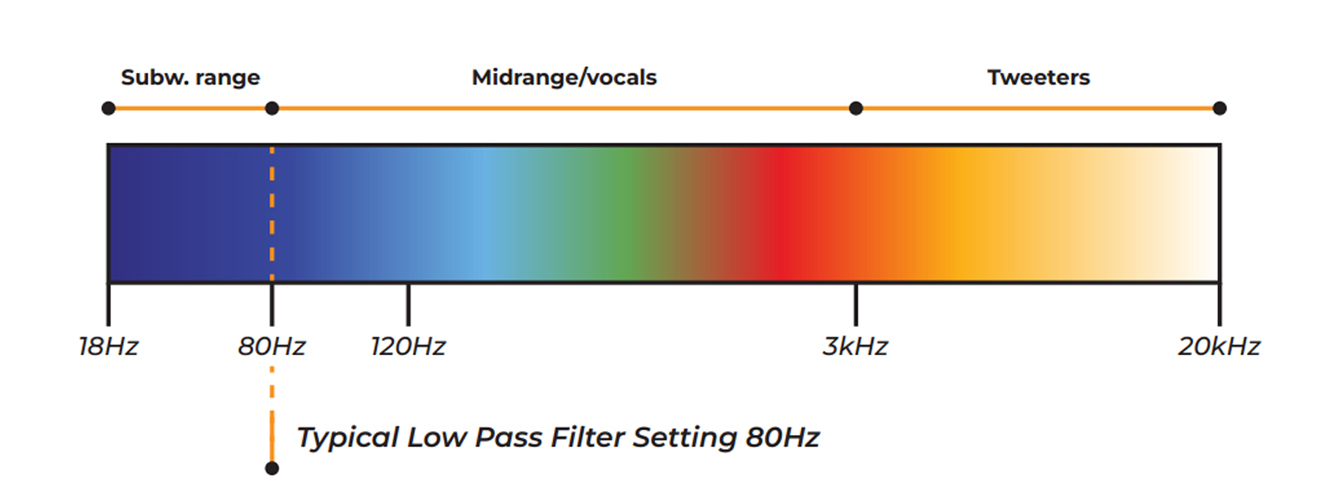
- The low-pass filter manages the upper limit of sound frequency (measured in Hz) produced by a subwoofer, effectively preventing any frequencies beyond the chosen value from being allowed to pass through
- A subwoofer’s frequency range works between 16Hz to 120Hz, while LFE (low frequency effect) mode enables full range and takes this to 200Hz+ on many subwoofers
- A rule of thumb is to set the LPF on your subwoofer to match the lowest frequency that your primary speakers can produce for optimal performance
- In a home cinema system, the AV receiver should always set the speakers’ crossover to 80Hz or above and the speakers size to small
- When using subwoofers in a stereo hi-fi system, follow the 70% setup rule (set the low-pass filter to 70% of your speaker’s lowest frequency); if using an AV Receiver, switch it to Pure Direct mode to enjoy full-range audio when in stereo
What is the Low-Pass Filter on a Subwoofer?
The aim of the low-pass filter in a subwoofer is to diminish or, at the very least, control high-frequency sounds as they pass through a speaker.
It’s preferable to reserve those frequencies for the main speakers, in which performance is optimised for midrange and higher frequency information, such as dialogue and vocals. This allows the subwoofer to focus on what subwoofers do best – bass!
With that said, subwoofers can handle higher frequencies, but restricting them to the range of 16Hz to 120Hz is often preferred in the context of a home theatre or hi-fi system. These setups comprise multiple speakers, and so restricting subwoofers to this frequency range will create the perfect blend of all the speakers in the system.
Many people mistakenly view the low pass filter on a subwoofer as merely a knob to adjust. However, it serves as a much more crucial functional tool that dynamically interacts with your speaker system.
Its role is to ensure seamless integration of the subwoofer with any speakers. For instance, if you have larger speakers—like floorstanders—capable of producing lower frequencies, you can adjust the LPF setting on your subwoofer to match the floorstanders’ lowest attainable frequency.
This prevents the subwoofer from duplicating the same frequency as the floorstanders, avoiding unnecessary emphasis on that particular range. You should consult your speakers’ user manual for their complete frequency range.
What About LFE?
It’s worth noting that many modern subwoofers also contain a low frequency effect (LFE) setting as part of their low pass filter control. LFE delivers a “full range” of frequencies, reaching as high as 200Hz, and becomes more important when dealing with very small speakers that have limited frequency ranges.
You can start by setting the low pass filter to LFE, but we would recommend reading the rest of this guide to help you refine the performance of your system from there.
High-cut Filter
Depending on the model of subwoofer you own, the low-pass filter control might be referred to as a high-cut filter, but don’t panic, it’s the same thing.
What should I set my subwoofer’s low-pass filter to?
For music playback in stereo, there is a rule thumb: set the low-pass filter to 70% of the speaker’s lowest Hz. This works with both floor and stand-mount speakers when integrating a subwoofer into 2.1 speaker configuration.
Following the 70% setup rule, for a pair of ordinary floorstanding speakers rated at 35Hz, the subwoofer’s LPF level would be 25Hz. Similarly, bookshelf speakers rated at 64Hz gives the subwoofer an LPF level of 44Hz.
This method creates perfectly balanced sound without overlapping the same frequencies. The floorstanding speakers deploy at 35Hz and above, while the subwoofer provides 25Hz and below. Efficient!
Connection
Subwoofers come with two different types of connections for stereo use; both share the same setup procedure but vary in their connection type. The first is the traditional pair of stereo RCA leads with a 10k impedance input.
The other, an unconventional option, is the Neutrik Speakon Connection, which operates at 100k impedance. Both connections maintain the stereo signal path from the amplifier, with the Neutrik Speakon receiving an identical signal alongside the speakers.
To bi-amp your speaker, use the bi-amp input for the Neutrik Speakon cable.
You might wonder why these connection options are significant. Brands like REL are renowned for their subwoofers’ ability to seamlessly match the character of the main speakers, resulting in a better overall sound quality. Some brands even include a high-level low-pass filter because the subwoofer has two different low-pass filters to accommodate various input types.
Modes
If you have an AV receiver and are curious about how to access the complete spectrum of musical signals, simply switch the AV receiver to Direct or Pure Direct mode. This unleashes the full range of signals and transforms the AV receiver into a dedicated stereo amplifier mode.
It’s recommended to do this primarily when you’re using an external DAC, CD player, turntable, or a streaming device with an integrated DAC, as this external source will enhance the musicality of the audio.
If you’re looking for more info on LPF in receivers or LPF modes, stick around; these next two sections are for you!

The Low-Pass Filter in Your Receiver
In addition to the physical low-pass filter control on the back of your subwoofer, within home theatre systems there are additional ways of controlling the low-end output of your speaker system. The menu of most AV receivers has a dedicated section for configuring the number of speakers and their layout within your system.
As you navigate this section, you’ll often come across 80Hz, which is commonly assigned to various speaker channels as the default setting. So, why is 80Hz so significant, and how does it connect to the cut-off point?
The 80Hz figure you see represents the designated crossover point. This crossover point signifies the specific frequency (measured in Hz) at which audio transitions from your primary surround speaker channels to your dedicated subwoofer channels.
Since your AV receiver is responsible for directing audio to both your primary surround sound speakers and the subwoofer, you need to establish the crossover point to instruct it on where to send specific audio frequencies.
This configuration allows AV receivers to accommodate various speaker systems, as you can tailor the crossover point to match the frequency range of your particular speaker model.
For instance, setting the crossover point at 80Hz means the AV Receiver will route frequencies below 80Hz to your subwoofer channel(s) while directing anything above 80Hz to the surround speaker channels. This setup prevents the duplication or overlap of the same frequencies among different speakers in your system, ensuring a balanced and harmonious audio output.
In essence, the crossover point in your receiver works very similarly to the physical low-pass filter control on your subwoofer. The crossover point and LPF should be used in conjunction within a home theatre system to ensure that all speakers in the system receive and output the correct frequencies, exactly to your taste!
Low-Pass Filter Setting Modes
So, we know that the low-pass filter blends the subwoofer in the room with the speakers. But how does it work?
Each of the modes listed below provides specific instructions for the filter. Depending on the input you’re using, the number of decibels by which the filter reduces sound in order to gradually fade out the audio will vary.
With setup, both the slope (crossover) and the modes are intertwined. And without setting one correctly, it will be virtually impossible to configure the other for a seamless blend.
Bypass
This, in essence, means the bass management within the AV receiver will take control of the subwoofer frequency ranges.
Products like ARC, Room Correction, and DIRAC are prime examples of why this would be advantageous in certain rooms. It gives the software full control over your woofer once adjusted to a required level. This extremely sophisticated software maps your room and removes any peaks and troughs which could create unwanted booms.
Third and Fourth Order
The 70% rule comes into play when using third and fourth-order settings. These settings involve the pre-outs from your integrated stereo amplifier, connected to the left and right RCA inputs on your subwoofer.
The goal is to adjust the crossover, roll-off, and gain levels to ensure the low-pass filter creates a seamless transition point that’s indistinguishable between the speakers and subwoofer.
There are some distinctions between the trim levels of the Third Order and Fourth Order configurations. The Third Order offers a -18dB slope for every octave, while the Fourth Order has a steeper -24dB slope.
Additionally, the Fourth Order configuration provides a faster response time than the Third Order, making it more commonly used in hi-fi and home cinema setups.
How the slope and octave interact
An octave represents a doubling or halving of frequency, meaning the difference between 80Hz and 40Hz is one octave. Depending on whether you’re using a third or fourth order configuration, the sound levels (measured in dB) will decrease according to the selected order. For instance, if we use a measurement of -24dB, frequencies at 80Hz will be 24dB quieter compared to 40Hz.
Common slope crossover settings include -6dB, -12dB, -18dB, -24dB, and -36dB, although these values may vary depending on the brand and model of the equipment.
Understanding the Slope Crossover for Subwoofer Settings
You should consider the slope effect when configuring your subwoofer. Let’s say you have a pair of listening speakers with a bass drop-off of 38Hz. Following the hi-fi rule of 70%, this leads to a figure of 27Hz.
This point is where your subwoofer should begin producing sound, aligning with your main speakers to create a seamless crossover without any interference.
To establish a suitable volume level, set the slope (crossover) dial to 50% (the midpoint) when playing music.
If you notice that the sound is muddy and overly loud in the mid-range, it suggests that the upper frequency trim is too high. In this case, adjust the slope downwards to your preference.
However, if the bass seems lacking—with deep bass sounding great and mid-range being strong, but an empty area in between—then you should adjust the slope upwards to your liking.
Being able to blend your speakers and subwoofer isn’t particularly challenging when following these straightforward guidelines, yet many people hesitate or struggle to do so.

What about the subsonic filter?
What’s the subsonic filter all about? If you want deep thundering levels of bass – the kind that pounds through the body – you need to create a clean and dynamic sound that is undistorted.
The subsonic filter ensures the subwoofer never overstretches its own inner components, ensuring it stays composed and within its own specifications. This ensures it has maximum longevity whilst performing those tasks which subwoofers do best.
FAQs
How do you know if a filter is low or high pass?
The simple way to find out if a filter is low or high pass is by listening to what it’s doing when you adjust it. If you find the low-level frequencies are being reduced in volume then this is a high pass filter. A low pass filter will, instead, remove the higher frequencies.
What are the cons of a low-pass filter?
Any kind of filter, including a low-pass filter, will lose some information. It even happens with the most sophisticated room correction software too. At worst, it can fundamentally change the character of the product you are wanting to listen to. This is an extreme example though.
What is a high pass filter good for?
A high pass filter is used to direct all frequencies above a specific point to the tweeter. This is typically done when the mid-range driver’s highest frequencies can be better handled by the tweeter, preventing redundancy and ensuring efficient use of the speaker system.

Final Thoughts
I hope this has given an insight into what the low pass filter does and how it can enable you to get the best out of your subwoofer. Please take what you have read as a guide—there is no right or wrong way to configure your subwoofer’s or AV receiver’s LPF.
Every room is different, as is the listening experience of each person. The best advice I can give you is that if what you’re listening to isn’t enjoyable after following this guide, change it to taste.
If you do find it of benefit, let us know in the comments below and share where you found the most improvements in your system.


0 Comments